OK, so you’ve embarked on this awesome yet challenging sourdough journey. And you’ve got yourself a nice active sourdough starter. Congratulations! That’s already an achievement 🙂 And that also means that you’re ready to start putting it to work. If you’ve had your starter for at least 7 to 10 days, and it’s constantly been active over the last days, you kind of see a pattern in its activity, then it might be strong enough to raise you a delicious sourdough loaf. So I’ve put together this recipe of beginner sourdough bread to get you started. It’s the loaf I also started with, and tried several times afterwards. And it’s never let me down 🙂
However, if you’re only now considering trying sourdough bread baking and need some guidance on how to put together your own sourdough starter, you might want to first check out my notes on that first.
Ready, steady, bake!
A few months ago, when I started again baking sourdough bread, I convinced myself to begin working with a lower hydration. I did want to get to a level where I’ll be able to work with wet dough, but I knew I had to be patient this time. Start low and increase gradually. And so I did. And it worked for me. Especially since handling (pre-shaping & shaping) was kind of the most challenging part for me. I can therefore strongly recommend you to start with a stiffer dough, if you’re only beginning making sourdough bread.
I know you might’ve seen all those awesome videos on Insta with great bakers doing their magic with the dough. You might think it can’t be that difficult. But of course it looks easy in the hands of someone who’s probably done that hundreds, if not thousands of times. So why not spare yourself some frustration, and start with a manageable dough. I had seen a lot of homebakers I follow on Insta recommending this from their own experience. With this in mind, I settled to begin somewhere at 70% hydration and mostly strong white wheat flour. Keep it simple, I said to myself.
Everything went well that time. And it’s nice when it does, it gives you a boost and makes you want to work your skills up the game. Because there will also be fails, and you need to enjoy the little sourdough victories. Especially in the beginning, until you get to have some constant good results.


The recipe
I am therefore sharing below the recipe of the first loaf I made this last time I engaged into the sourdough journey. It is, however, a recipe which I tried to make simple, with direct quantities instead of baker’s percentages. It can take a little while until you get your head around with how the baker’s percentages work. Or maybe you don’t really want to go that deep into it, so here’s a recipe that should be easy to follow.
If you, however want to find out more about baker’s percentages and be able to come up with your own formulas at some point, and easily scale up or down, you can whenever DM me on Instagram or write me an email and start a conversation around it. Cause I love talking bread. But if you are just curious and would like to get an idea of the concept, there’s a good explanation of it, on The perfect loaf blog.
Below you can see the quantities for both a small loaf or a bigger loaf. I started with the big one the very first time. But after a while I realized that I prefer baking smaller loaves and more often, so that’s how I ended up with the formula for my small loaf (around 550g baked loaf).
Before we get started, you have to also know that, while this overall doesn’t require a lot of handling per se, it is a process that will last one day and a half – two days. So, are you ready?
Ingredients
Levain/ sourdough starter*
- 15g ripe starter
- 30g water (neutral to touch)
- 30g strong white flour
For a small loaf
- 70g levain**
- 210g water
- 280g strong white flour***
- 35g wholegrain rye flour****
- 7g salt
- extra – rice flour
Levain/ sourdough starter*
- 23g ripe starter
- 45g water (neutral to touch)
- 45g strong white flour
For a big loaf
- 100g levain**
- 300g water
- 400g strong white flour***
- 50g wholegrain rye flour****
- 10g salt
- extra – rice flour
Notes
*Preparing as much of the sourdough starter as you need for your upcoming loaf is the first step. I like to prepare a levain on the side, just the amount I need for the loaf I’m working on, that way I’m sure I don’t accidentally use all of it 🙂 Also that gives the flexibility to feed it in order to have it peaking when I need it to. This is the ratio I use to have the levain at peak in about 5 hours, and start build the dough in the afternoon.
**It is ideal that you use your starter when it is peaking, that means when it is at its maximum growth, just before it starts collapsing or when it’s just started to fall a little bit.
***Strong white flour means a white wheat flour with a high protein content. If you check the label, the protein percentage should be somewhere in between 11 and 13. You’ll most often find it as number of grams protein per 100g flour. A strong bread flour will give you a strong elastic dough.
****I like adding a tiny bit of a wholegrain flour to the dough, it really improves the loaf’s taste in comparison to a plain white loaf. But you can just as well only use white flour. Or if you don’t have whole grain rye, wholewheat should also do.
Tools
- kitchen scale
- a rubber band/ a marker/ tape
- mixing bowl
- bench knife
- a banneton or a bowl lined with a tea towel/ cotton or linen cloth
- a lame or a serrated knife to score the bread before baking
- a dutch oven/ baking stone/ baking steel
Method
The levain
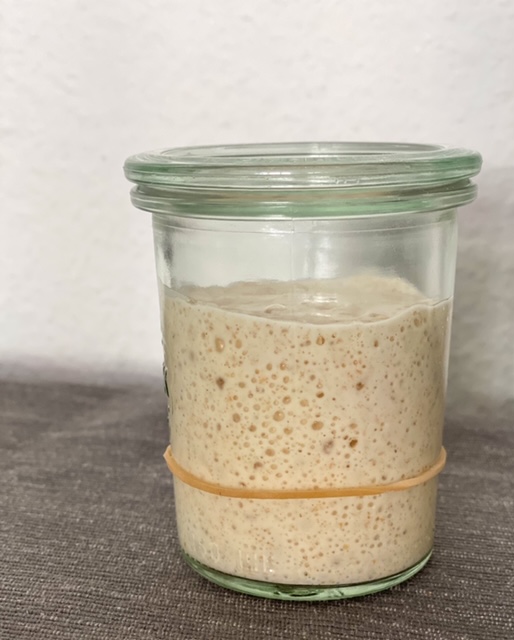
In a clean transparent jar/container place the water at neutral temperature (should neither feel cold nor warm at touch). Add the mature starter and stir a bit until it’s dissolved. Then add the flour and stir until all the flour is wet. Level it down on the bottom of the jar/container and set a rubber band or tape to mark the level. The levain is ready to use when it has at least doubled in size (it can even triple, it will basically behave the same way as your starter does), and that dome starts to fall back a tiny bit.
I usually prep my levain in the morning, when I’m also normally feeding my starter, so I can keep an eye on it and start building the dough when I see it’s peaking. On this feeding ratio (1:2:2), I get my levain to peak in about 5h or so. If you need to have it peaking faster, you can adjust to feeding at 1:1:1 ratio (1 part water to 1 part ‘old’ starter to 1 part flour), you just need to calculate keeping in mind the final amount you’ll need to use in your recipe.
The dough build
1. Once your levain is peaking, you can start building your dough. Pour the water into a mixing bowl, holding back 20g of the total amount for the next step. The water temperature should be neutral to touch. Then add the levain to the water (it should be floating, showing you it’s airy and ready to use). Stir a bit just to dissolve it into the water. Then add the flour and stir just until all the flour is wet. You can use your hand to do this, or a silicone spatula. I used to do it with my hand in the beginning, now I find it easier to use the spatula. Once all the flower is wet, cover the bowl with a wet towel, or a shower cap which you can reuse, or with a silicone lid, or plastic film. Let it rest for half an hour.


2. After the half an hour rest you’ll notice that the dough has already started changing its structure. Now it’s a bit more smooth. Add the salt and the remaining 20g water. With your wet fingers press the salt into the dough. Then squish and fold on itself until the salt and water are incorporated and the dough becomes smooth again. It will tend to fall apart in the beginning, that’s perfectly normal. Hold a small bowl with cold water next to the mixing bowl and make sure you water your hands when needed. That will prevent the dough from sticking to your hands. Let the dough rest covered for 30 more minutes.


3. Now it’s time o start building some strength and structure in your dough. And you can do that through a set of folds. I like to start with a strong stretch & fold. With your wet hand grab the dough from the side across from you, stretch it upwards as much as the dough allows (until you feel it is resisting), then fold onto itself, towards the side where you are. Rotate the bowl 90 degrees and repeat the move 3 more times, until you’ve completed the circle. By the 3rd stretch and fold you’ll already notice that the dough is getting stronger. It is resisting to you when you try stretching it out. That’s how it should be. Now cover the bowl and let the dough relax for 30 more minutes.
4. When I work with stiff dough, I like to use lamination in the first part of the fermentation process. Place the dough on your clean moist counter top, and with your wet hands easily stretch it aiming to create a rectangular shape. You can also use a bench knife to help you get a hold of the dough when the edges are sticking. Once you feel you’ve stretched it to the maximum (almost paperthin), you can start folding it onto itself. Start from one side, folding 1/3 of your dough sheet towards the center part, and the same with the 1/3 from the other side. Repeat from the top edge across to you and from the bottom next to you. Flip upside down and move the dough to the bowl (or to a clean container, if you prefer). Cover and let rest another half an hour.


5. As we advance in the proofing process, and the dough is starting to raise, I’m trying to pay extra attention to handling. Because we don’t want to deflate it. That is why I like to use coil folds at this stage, as I find it a little more gentle with the dough. With a stiffer dough like this, however, a full coil fold set can be a bit difficult to perform. But I usually do half folds when I see the dough is resisting. So, with your wet hands grab the dough from underneath the sides, gently lift, and let the part across from you fold under itself. Repeat with the side of the dough clossest to you. Cover and let he dough rest for 30 minutes.
6. Perform one more half coil fold, just as you did on the previous step. But try doing it for the other two sides that didn’t get folded underneath last time. This will be the last time you will be handling the dough before shaping it. Now it’s time to let it rest for a couple more hours. You want your dough to raise by 20-30%. That might be difficult to notice, but with time you’ll learn how to read your dough. The proofing time depends on the ambient quite a lot – on a hot humid day, things will be moving faster than what you’re used to. And on a colder day you might want to give the dough an extra half an hour. It can be helpful for you to take notes about the time and the ambient temperature, so you can adjust as needed.
7. Now it’s time for shaping. Since the dough is a little bit more stiff, you don’t need to preshape. Place the dough on your slightly floured working surface. Form it into a boule if you’re baking a round shaped loaf, or into a batard if it’ll be a long one. Place in a banneton lined with rice flour (or a bowl/tin lined with tea towel and rice flour). If it feels like it should proof a bit more, give it 20 more minutes in the banneton. Cover with a plastic bag (which you can reuse) and place in the fridge for the cold rise overnight (min. 12h).
The bake
Baking into a Dutch oven
Baking into a Dutch oven is one of the best ways to give your loaf the chance to rise to its full potential. However, it can become difficult as you increase hydration, because it is challenging to get your bread down there without deflating it. That if you have a normal iron cast deep pot with lid. If you, however have one formed of two parts and can have the flat pan-like part at the bottom, then it’s perfect as you can just flip the loaf out directly onto the baking surface.
Place the dutch oven (pot+lid) into the oven and turn it on to 250C and let it heat up for 45min to 1h. You need everything to be super hot. Once that time has passed, carefully take the dutch oven out of the oven and place on the stove.
I always bake straight out of the fridge. I find it very convenient to score the loaf when it’s cold and stiff. Take the banneton/ bowl out of the fridge, drizzle a little bit of the rice flour on the surface, then flip it on to a baking sheet and slash as desired with a lame or a sharp serrated knife. You are scoring the bread to guide it where to expand. But you can just as well bake without scoring, and the top will crack randomly. You can do that especially in the beginning if you’re curious to see how it will act on its own.
Gently transfer the loaf into the hot Dutch oven (the baking paper should help with that) and place the hot lid on then quickly place back into the oven. Handle with care, so you don’t burn yourself.
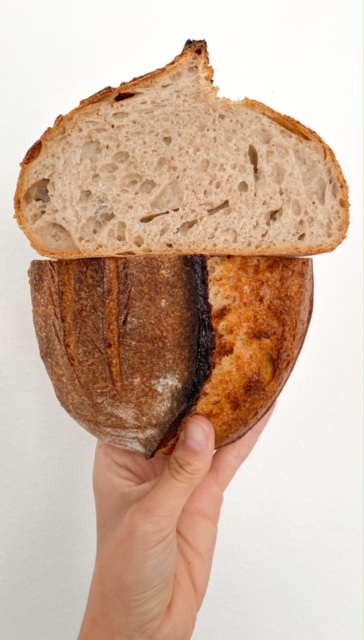
Bake with lid on for 15min for the small loaf/ 20min for the big loaf. Then gently take the dutch oven out and remove the lid. This is maybe one of the most awaited moments. For me it’s like opening a present on Christmas. It’s so great to see if and how your loaf has raised. Then place back in the oven, reduce the temperature to 225C and continue baking for about 20 more minutes, or until brown on top. It absolutely depends if you like a darker baked loaf or a lighter one. You can try various temperatures and times for this second half of the bake and find your preferred way.


Remove loaf from the Dutch oven and let it rest on a cooling rack. The loaf should feel light and it must sound hollow when you hit it with your fingers on the bottom. Let it rest at least one hour (ideally until it’s completely cooled down) before cutting it open.
Baking on a baking stone/ steel
If you have a baking stone or a pizza steel, you can also bake on these, but you’ll have to create extra steam in the oven. Place your baking stone/steel in the oven, a little lower than on the middle rack, and one oven tray on the lowest shelf of the oven. Preheat the oven at 250C for 45min to 1h. You need everything to be super hot. Just before the time has passed, boil about half a liter of water, so you have it ready when you get the loaf into the oven.
Take the banneton/ bowl out of the fridge, drizzle a little bit of the rice flour on the surface, then flip it on to a baking paper and slash as desired with a lame or a sharp serrated knife. Use a flat baking sheet or pizza peel to slide the loaf on to the preheated baking stone/ steel in the oven. Try to use a quick move when doing that.
Right after sliding the loaf in the oven, pour about 300 ml of the hot water in the hot tray from the lower shelf in the oven, then quickly close the door as you want all the steam inside. The steam will keep the surface of the bread moist for a longer time and prevent it for setting crust too early, before the bread has had time to raise enough.
Bake at 250C for 15min for the small loaf/ 20min for the big loaf. Then crack the door of the oven open to release the steam (watch out, it’s super hot, make sure your face is not in its way), reduce the heat to 225C and bake for 20 more minutes. The loaf is ready when the top is brown and when it feels light and when hit with the fingers on the bottom, it sounds hollow.
When I bake on my baking stone, because I have a very old oven that only heats from above, I always get a light bottom by the time I’m done baking and the top looks dark brown. So what I do is that I leave the loaf in the oven with the heat off and the door slightly open, for 10 more minutes. That allows the bottom to cook a bit more, without burning the top.
Let the loaf rest on a cooling rack for at least one hour after taking it out of the oven. Ideally until it has completely cooled down.
Cutting it open
That’s maybe the most highly anticipated moment of making a sourdough bread. That’s when you’ll see if you’ve fermented it long enough, or maybe too long, or if you’ve handled the dough gentle enough. And those are things you’ll learn with time, just by practicing. Moreover, with time you’ll even be able to anticipate how the inside will look like, just by how the loaf feels at the moment of scoring or by how the half bake looks like.
However, what I love about sourdough bread is that no mater if you nail the fermentation or not, it just tastes so good. And my favourite way of tasting the bread is first taking a bit of it just as it is, and try to feel the different notes you get from the different types of flours, and then the final test is with some good salty butter spread on it.
Hope the length of this process and recipe hasn’t scared you away, but it will give you enough details to put together a first sourdough bread bake. And as always, please do let me know if you’re trying it out. Should you have any specific questions, do not hesitate to write to me, I’ll be happy to help if I can.
Happy bread baking, everyone!

