Crème caramel (or ‘burnt sugar cream’ as we call it in Romanian) is that desert of my childhood my mom would always fix when we were having too many eggs and we wouldn’t want them to get too old. It seemed fairly easy to make from what I saw my mom was doing, but somehow it took a long time until I decided to try make it myself.
All about the texture…
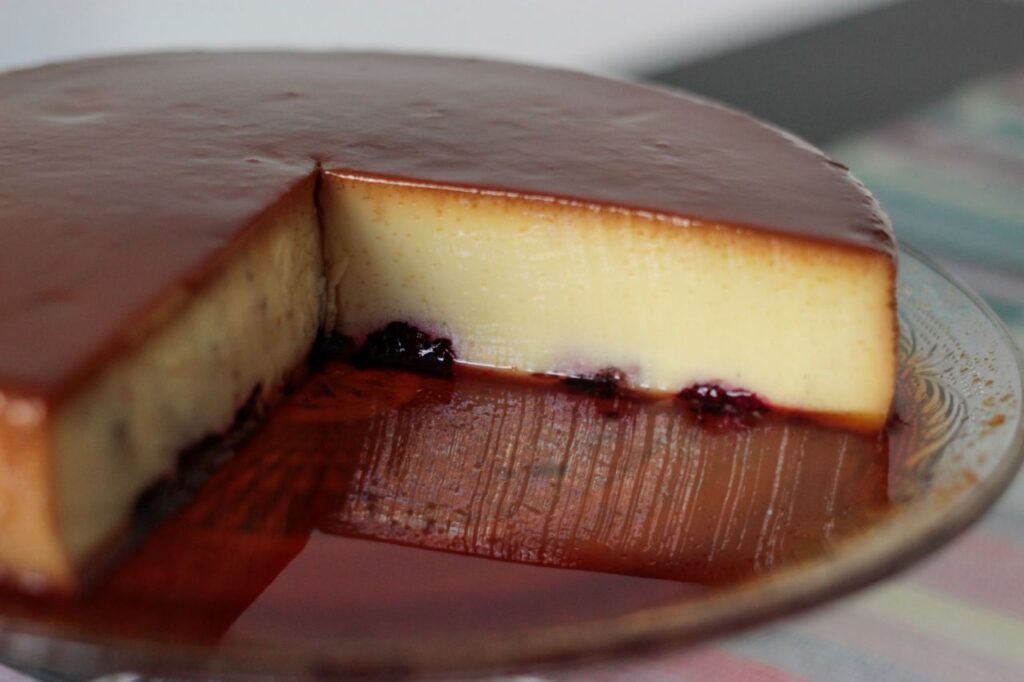
Must’ve been that strange texture I remembered my mom’s crème caramel had here and there. I’m so much about textures when it comes to food. So I imagine it was that strange fatty texture the one my mom was making had on the edges, as opposed to the perfect smooth custardy consistency it had in the center. But as I became more interested into baking, I started looking into what was potentially making my mom’s crème caramel that way. I then researched and read different recipes online. And I figured out that baking it in a bain-marie, just like I had previously done with crème brûlée, would actually help it cook evenly and prevent it from quickly boiling and form big bubbles. So I decided to give it a try and it was such a great surprise to obtain that perfect pudding-like texture all over the desert.
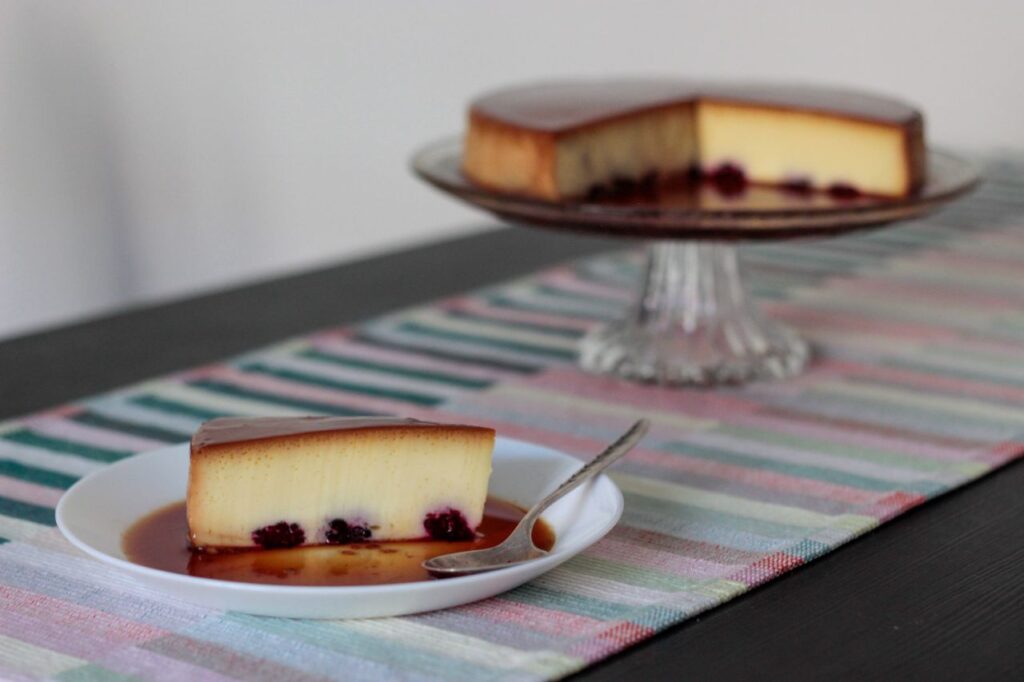
The blackberry crème caramel
I have since then baked it quite a few times, sometimes just plain vanilla or rum, and sometimes with fruit add-ons, getting that jiggly perfect texture every single time. After trying various combos, I must say my favourite must be the crème caramel with blackberries. So go ahead, take advantage of the berries season which is in full swing right now, and bake yourself a jigglycious ‘burnt sugar cream’ with berries inside or just as a side.
Ingredients:
- 130g sugar for the caramel
- 140g sugar for the crème
- a pinch of salt
- 8 eggs (M/L)
- 800 ml whole milk
- 1 tsp vanilla paste/extract or seeds from one vanilla bean
- optional: fruit add-ons – I used a handful of freshly picked blackberries
Tools:
- 21-22 Ø ovenproof pot/casserole + an extra ovenproof pot large enough to be able to accommodate the first pot and water surrounding it
Instructions:
- Place the sugar in the oven proof pot and melt it on medium-low heat until it gets an amber colour. Remove from heat and easily ‘paint’ the walls of the pot with the caramel (about halfway), by easily rotating the pot. Careful, use slow movements, so you don’t get the hot sugar on your skin. Repeat until the caramel sticks well to the walls of the pot. Then let it rest until it gets to room temperature (caramel will start cracking while chilling down, do not worry it is perfectly fine).
- While the caramel is chilling, preheat the oven to 180C and start prepping the crème. In a mixing bowl place the eggs, sugar, a pinch of salt and the vanilla (seeds/ paste/ extract). Mix on medium speed for about 4 minutes until you get a light pale foam on top. Add the cold milk and mix everything together on medium speed for a couple more minutes. Pour the crème in the ‘caramelized’ pot. If you choose to add fruits, this is the moment to do it – easily put them one by one in the pot, they will float in the crème, so you’ll be able to see when you cover the entire surface.
- Place the crème caramel pot in a bigger oven proof pot and fill the big one with cold water halfway. You will bake the crème caramel in bain-marie which will prevent the creme caramel from boiling too fast and getting large bubbles. Place the pots together in the oven. Add 50-100 ml of cold water every 10-15 minutes, to avoid boiling.
- Bake for about 60-70 minutes, without ventilation. It is another one of those bakes where the consistency really depends on the oven (just like my Burnt Basque Cheesecake). And you’ll get to know yours. You’re looking for a slightly brown surface and when you move it, it must not look so ‘liquidy’ anymore, it will still be a bit jiggly, but it must look set. When you feel it’s set, just take it out together with the bain-marie and let it sit 10 more minutes inside the hot water. Then take it out of the bain-marie and let it cool down to room temperature. Afterwards place it in the fridge and let sit overnight.
- It can both be served by scooping it from the pot in some bowls (always serve with the caramel sauce, it’s simply delicious). Otherwise, you can just turn it upside down on a cake plate – make sure you run a knife between the edges and the walls of the pot so it is all free, and make sure you get a deep plate to turn it upside down on, as it will have a lot of caramel sauce (I usually try to pour some of the sauce in a bowl before turning it upside down). Keep in the fridge and enjoy cold 🙂


Happy baking, everyone!