This is one of the most addictive sourdough breads in my opinion. I’ve had my eyes on a sourdough focaccia even before putting my newest starter together. So, right after baking my beginner sourdough bread, this was the second experiment with my (back then) 10 days old starter. And I have totally and irreversibly fallen in love with it. I love its texture, that chewiness and how delicious it is dipped in a salad’s leftover dressing 🙂 Yes, that’s common practice in Romania, where I come from. Dipping a piece of bread in a summer tomato salad leftover juice is one of the small joys in life.
I have therefore baked this focaccia quite often over the last few months. Be it to have as a side for some fresh summer salads, as a stand alone snack, or as bread for next morning avocado and scrambled eggs sandwich. Never disappointed! And since I’ve had quite a few requests for the recipe, here I am, putting it together for all of you focaccia lovers out there. The recipe here is with sourdough. But if you however don’t have a starter or access to a sourdough culture, worry not! Just send me an email or a DM on Insta, and I’ll be happy to help with the formula with yeast instead.


Sourdough focaccia inspiration
I started baking this one as I was mesmerized by all the focaccia madness on Instagram. And especially the one around @memoirsofabaker‘s focaccia. So it’s one of his formulas and methods I started with and settled for my favourite that I’m sharing here. I however recommend having a look at Garteh’s Insta account. He’s very creative and experiments a lot. Not only with focaccia, but with all things sourdough in general. And occasionally with pastry.
If, in the meantime, you decide to give it a try with this focaccia recipe, I would love to hear from you. Don’t forget: sharing is caring!
Ingredients (makes a 23x33cm tray):
For levain:
- water (neutral to touch) – 50g
- ripe sourdough starter – 50g
- strong white flour (I use tipo 00 for focaccia) – 50g
The dough build:
- 300g water (neutral to touch)*
- 150g levain (the one above)
- 425g strong white flour (I use tipo 00 for focaccia)
- 12g sea salt
Toppings**:
- some good olive oil
- sea salt flakes
- fresh rosemary (optional)
- cherry tomatoes, halved (optional)
- green olives, sliced (optional)
Tools:
- a mixing bowl
- a transparent container
- a baking tray 23x33cm or 27x27cm
Notes:
* I have seen that some people use mozzarella brine as partial or total amount of liquid in their focaccia (fx. @_flour_water_salt). I haven’t tried this just yet, but I find it very interesting and will for sure gonna give it a try as soon as I get my hands on some mozzarella and remember to save the brine and freeze it down.
** With the toppings, sky is the limit. It also depends on the purpose of your focaccia. I would keep it simple if it’s meant to be a sandwich bread, and go ‘all in’ if it’s gonna be more of a meal on its own. I saw people adding spring onions or red onion rings (honestly, bread with onion is always a winner), kalamata olives, feta cheese or even potatoes. Let your creativity work and play with the combos. Unlike me, who seems to always use the same 🙂
Instructions
1. In the morning, when you feed your starter, prep the levain for your dough. In 50g water add 50g ripe sourdough starter and stir a bit until dissolved. Add 50g of the flour you’ll be using in the focaccia. Set aside in a warm place and keep an eye on it. You want to catch it when it’s peaking (4-5h after feeding).
2. When your levain is at its peak activity, start building the dough. In a mixing bowl add 275g water (hold back 25g for the next step). Add the levain you built at step 1 – it should be airy and floating in the water. Stir a bit to dissolve. Then add the flour and mix until well combined. You can either use your hand or a silicone spatula so you can easily scrape the walls of your bowl. You’re not looking to knead the dough, but only to completely hydrate the flour. Cover the bowl and let rest for 30 minutes.
3. Add the salt after rubbing the crystals between your fingers to crush them a bit. Then add the rest of the water, dimple down with your fingers, and squish, in order for the dough to absorb the salt and the extra water. The dough will separate, no worries, that is perfectly normal. Just keep squishing and fold onto itself until the dough gets back together. Remember to keep a small bowl with cold water next to you and water your hand whenever needed. That will prevent the dough from sticking to your hand. Dough will be very wet and sticky, that’s how it’s supposed to be. It will get smoother as we will be building more structure to it. Cover and let rest for 30 more minutes.
4. Start with a strong stretch and fold. With your wet hand, grab the dough from the edge across from you, lift and stretch until you feel the dough is resisting you. Then fold onto itself. Rotate the bowl with 90 degrees and repeat the stretch and fold move. Repeat that 3 times, until you have completed the circle. By the time you’ll be performing the third and fourth stretch and fold, you’ll notice the dough is getting stronger and it is now fighting you, you can therefore not stretch as much as you did during the first time. That is a good sign. Cover and let the dough relax for 30 more minutes.
5. Repeat step 4 three more times, separated by 30 minutes each time. Make sure you become more gentle with each stretch and fold session you are performing, so you won’t release all the air trapped in the dough.
6. After the last stretch and fold session, place the dough into a transparent container, lightly oiled with olive oil. Cover and let ferment one more hour at room temperature. Then place in the fridge and cold ferment for up to 24 hours – that’s where the taste develops. Since you’re using a transparent container, it’s nice to mark the dough level when you’ve just placed it there. So you can observe the progress and how it’s rising.
7. Next day, take the dough out of the fridge, about one hour before you’re going to bake it. Let it sit on the counter so it gets to room temperature and it’ll be easier to work with it. In the meantime preheat the oven at 250C with a baking stone/steel inside, or if you don’t have one, just use an oven tray instead. If you’re using a baking stone/steel, you’ll need to preheat the oven for 45min-1h.
8. Line the baking tray with baking paper and lightly oil with olive oil on the side where the dough will be. Gently turn the dough in the center of your tray (if you oiled the container, it should easily slip the walls. With your hands slightly oiled, try to gently spread the dough towards the edges of the tray. Ideally pull the dough from underneath rather than pushing it from above. Try to be as gentle as possible so you don’t lose the fermentation air pockets that will give you a nice open crumb. Pour some good olive oil on top of your focaccia and carefully massage it. Dimple the dough with your fingers, avoiding to pop the large air bubbles that might form on top of it.
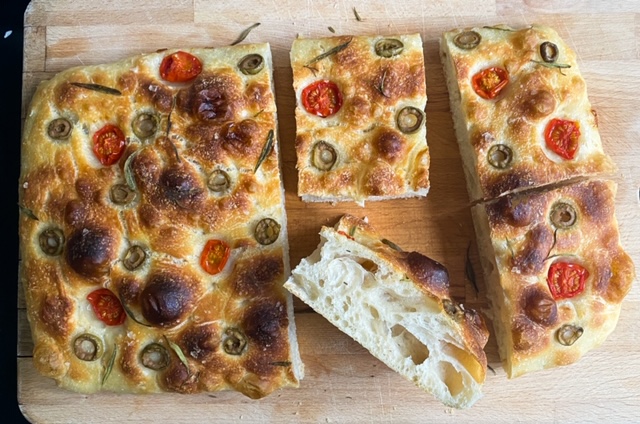
9. Add your favourite toppings. A classic focaccia that can successfully be used for a sandwich is only topped with fresh rosemary and sea salt flakes. My go-to topping combo is cherry tomatoes, green olive slices and fresh rosemary – the one you’ve seen so often in my Insta stories. I just love this mix, even the colour is amazing, reminding of the Italian flag 🙂 Coincidence?


10. Bake in the preheated oven for 20-25 minutes, fan off. With this setting, mine turns out pretty tanned, and that’s how I like it. However, if you prefer it a little lighter, you might want to turn the heat down a bit, but bake for longer instead. Being a wet dough, you really have to make sure it bakes through. Also, check if your oven bakes the same all over, I find that my focaccia needs a 180 degrees rotation halfway through the bake, as it tends to tan more in the back of the oven than in the front. Take it out of the oven and use the edges of the baking paper to remove from tray and let cool down for 10 minutes on a cooling rack. Cut into squares and enjoy!
Happy sourdough focaccia baking, everyone! And… buon appetito! 🙂
Sourdough focaccia
Step by step recipe for delicious sourdough focaccia.

Ingredients
- For levain:
- water (neutral to touch) – 50g
- ripe sourdough starter – 50g
- strong white flour (I use tipo 00 for focaccia) – 50g
- The dough build:
- 300g water (neutral to touch)
- 150g levain (the one above)
- 425g strong white flour (I use tipo 00 for focaccia)
- 12g sea salt
- Toppings:
- some good olive oil
- sea salt flakes
- fresh rosemary (optional)
- cherry tomatoes, halved (optional)
- green olives, sliced (optional)
Directions
- Step 1 Prep the levain 4-5h before building the dough. Mix 50g water, 50g ripe sourdough starter and 50g strong white flour (ex. tipo 00). Set aside in a warm place.
- Step 2 In a mixing bowl add 275g water (hold back 25g for the next step). Add the levain you built at step 1 – it should be airy and floating in the water. Stir a bit to dissolve. Then add the flour and mix until all the flower is wet.Cover the bowl and let rest for 30 minutes.
- Step 3 Add the salt and the last 25g of water and mix it in. Make sure you wet your hands whenever working the dough, it will be very wet and sticky. Cover and let rest for 30 more minutes.
- Step 4 Start with a strong set of stretch and folds. Cover and let rest 30 more minutes.
- Step 5 Repeat step 4 three more times, 30 minutes apart. The stretch and folds should be more and more gentle.
- Step 6 After the last stretch and fold session, place the dough into a transparent container, lightly oiled with olive oil. Cover and let ferment one more hour at room temperature. Then place in the fridge and cold ferment for up to 24 hours.
- Step 7 Next day, take the dough out of the fridge, about one hour before you’re going to bake it, and let it sit on the counter. Meanwhile, preheat the oven at 250C. with a baking stone/steel inside, or if you don’t have one, just use an oven tray instead. If you’re using a baking stone/steel, you’ll need to preheat the oven for 45min-1h.
- Step 8 Line the baking tray with baking paper and lightly oil with olive oil on the side where the dough will be. Gently turn the dough in the center of your tray and with slightly oiled hands stretch the dough from underneath towards the edges of the tray. Pour some good olive oil on top of your focaccia, massage it and dimple the dough with your fingers.
- Step 9 Add your favourite toppings. I like to use cherry tomatoes, green olive slices and fresh rosemary.
- Step 10 Bake in the preheated oven for 20-25 minutes, fan off. Take it out of the oven and let cool down for 10 minutes on a cooling rack. Cut into squares and enjoy!